

Track Day Suspension Setup Checklist
Trackday Suspension ChecklistThe main goal of your suspension is to control your tires and keep them in contact with the road. Under track conditions, your suspension is subjected to a world of forces that want to make your tires lose contact with the road. The following guide covers the basics on what values and settings you should take into consideration before hitting the track to get the most out of your suspension. This is merely a basic checklist and guide, for more in-depth tuning information check out The Definitive Guide to Tuning Your Suspension. |
Ride HeightRide height is the distance between the road and the bottom of your vehicle, usually measured at the axles. Lower is better in almost all track situations but as with all things suspension related it is a fine dance with your other components to get everything dialed in and keep it that way, so slamming your track car isn’t always best. Setting your ride height will require careful consideration of the track speeds you expect to encounter and spring rates along with dampening to find the perfect mix of all of these values to set your ride height. Keep your aero bits in mind too if you have any to make sure your clearance is still good when you’ve got downforces acting on your car. If you find yourself bottoming out on straights at high speeds you should either raise your ride height or stiffen your spring rates to prevent from bottoming out. |
Corner BalancingCorner balancing should be done once you’re done installing parts and modifying your suspension system. If you’re not too familiar with the basics and concept of corner balancing I suggest you brush up here. If you’ve dialed everything else in but your weight distributions were off because your vehicle was never cornered balanced, then you’ve wasted a lot of time leading up to your track day. Depending on your vehicle and track needs you’ll always want to go for even corner weights unless you’re running more weight in the front or rear to compensate for a suspension quirk of yours. Without having proper weight distribution before setting your other suspension values, (camber, toe, caster, etc.) you will be skewing your measurements and setup going forward. This will lead to your vehicle not handling as expected under certain conditions. Check out this corner balancing article for more information on the subject. |
 |
 |
Roll BarsRoll bars or anti-sway bars aid in reducing chassis roll along with controlling lateral forces in a turn. Tuning your roll bars is pretty straightforward and the adjustments are pretty apparent on the track so be incremental with your adjustments like everything else. Tightening your roll bars will decrease body roll but also increase the tendency for your car to understeer when tightening the front and oversteer when tightening the rear. These values are quick and easy to adjust in most cases and are a good place to start when troubleshooting or looking to change some under or oversteer characteristics. For example, if you’re getting a lot of understeers, the first place you’d want to look is your front roll bars. Understeer means your fronts aren’t getting enough grip so the solution would be to soften the front roll bar to allow the tires to better grip the road and bring your vehicle around the turn. The same principle goes for the rear of the car, to negate oversteer, soften the rear. If you want to introduce some oversteer into the mix, tighten them up. Your suspension tuning may take you deeper than just your roll bars in most cases but these are a good place to start. |
SpringsSprings have the job of helping control your rebound and compression in your suspension when coupled with shocks and also must be able to counteract the forces downforce enacts on the car to keep it from scraping along the ground at high speeds. You want to keep your spring rates as soft as possible to improve grip and keep your tires in contact with the road but as with all things suspension related there is a tradeoff. You don’t want to run your springs so soft that your car gets buried into the track on a straight due to the aerodynamic loads overloading your springs and pushing your vehicle into the ground. For higher speed tracks with lots of straights and places where aero will be a factor, you’ll want to go with a higher spring rate. For shorter and tighter tracks with not many straights, you can get away with softer springs and get a little more grip out of your tires. Check out the Automotive Springs section for more in-depth info. |
 |
|
|
Bump StopsAn additional component you can add to your spring setup if it is allowed by your hardware and racing series is a bump rubber. A bump rubber is in most cases a rubber stopper that is sleeved around the shock but under the spring to prevent your shocks from bottoming out. As the bump rubber compresses along with the spring it simulates higher spring rates acting on the spring as compression increases. This means that as aerodynamic forces push your car closer to the ground, the bump rubber increases the spring rate the lower the car gets to keep it stiff enough from crashing into the ground along with physically limiting the travel of your shock. Using this would allow you to run softer springs that you normally wouldn’t be able to use where a higher spring rate is required such as high-speed straights. |
ShocksShock absorbers are the unsung heroes of your suspension. While your suspension components control how your tires react and are positioned in relation to the road, your shock absorbers control the position of your vehicle chassis and the forces acting on all four corners of your ride to provide a stable and predictable feel to your ride while keeping your tires on the ground and keeping the energy entering and being released by your springs under control. Shocks and dampeners for competitive use come with a varying set of adjustments. Your most common ones being bump and rebound or compression and decompression. Fine tuning these values takes patience and track time to dial in. Understanding the basics of bump and rebound are important so if you’re not familiar read this first. Shocks that haven’t been properly adjusted or chosen to benefit the spring will do more harm than good. Your shocks and springs work together to control the dynamic forces on your car and having them set for different situations will cause issues. Generally, when making adjustments, when you stiffen your front shock settings, you’re increasing grip in the rear. When you stiffen your rear shock settings you’re increasing grip on your front tires. This should just be used as a general measurement and your shock settings go a lot deeper than just needing to be stiffened and softened. Check out this guide for actually tuning your suspension settings. |
 |
|
|
CamberIf you haven’t already gotten the basics of camber down, check out the camber section. Depending on the track and conditions your camber value needs will vary. You want your camber values to be between half a degree (.5) and depending on the tire and setup, up to 3 degrees of negative camber to adjust for the positive camber gain that occurs when in a turn at track speed. To determine if your camber needs adjustment you’re going to need an IR thermometer handy to take note of the heat profiles across the tire or just wait for uneven tire wear to see what kind of adjustments you need to make, but by then it’s too late. You want even temps and wear all across the tires, too much heat on the inside and you know you’re running too much negative camber. Too much heat on the outside means that your camber gain is too great at speed in a corner and your tire is leaning into the positive camber values which are rarely needed along with losing precious grip. To sum it up, if your tire heat signatures are sporadic then a camber adjustment needs to be made. |
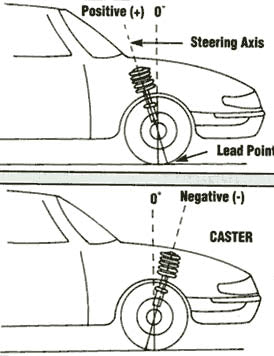
CasterCaster is the measure of steering angle and how much self-correction you feel while driving. This setting is half driver preference and half-track setup. A driver that prefers a stiffer driving feel or if you’re on a track with long straights, you’ll want to increase the positive caster angle. Higher positive caster angles are usually reserved for drag cars as the self-correction forces of extreme positive caster will keep the car in a straight line. Negative caster will require less steering input to turn the tires and less correctional forces if any at all in a straight line. Find out more about caster here. |
 |
|
|
ToeToe adjustments are what make or break a clean entry into a corner and are commonly overlooked. Camber adjustments are everyone’s focus but toe adjustments are arguably more important overall and changes to this value are a lot more noticeable than camber adjustments. Your toe adjustments should be close, if not completely at 0 but there are benefits to having certain toe values in the negative or positive space. For most track cars, a couple of degree of toe-out in the front will make the turn in on a corner require a little less steering effort and help the front tires change direction. A small degree of toe-in in the rear of your vehicle, especially in RWD cars will help with stability when putting down power when coming out of a corner. Toe adjustments can become more complicated than that but some simple adjustments would be where you would go to weed out some of that straight line and corner entry issues of instability. |
Bump SteerBump steer is everyone’s worst enemy whether you track your car or not. Bump steer is the tendency for your tires and suspension to change their values after hitting a bump, curb or just getting a wheel off the ground. Bump steer occurs as upward forces act on your suspension during wheel travel and physically move your suspension components outside of the value you set them at. BS (Bump steer) is a complex concept and takes a lot of track time and metrics to dial in properly. The components that affect and determine bump steer are mainly your control arms and tie rod along with any other movable components connected to them. To measure and address BS (not bullshit) you’re going to need a bump steer gauge. They come in a couple of different configurations but they all do the same job of measuring your bump steer. You want your bump steer as close to 0 as possible. The measurements you will be working with are sometimes hundredths of an inch but they make a huge difference. Dialing in bump steer in the rear should take precedence over the front but both are important. Bump steer in the rear causes unpredictable movements in the rear thanks to the changes in your camber and toe values which cause the rear to move in a way it is not expected to do. This not only slows you down but decreases driver confidence which also eats into your times. |
 |


ConclusionThese settings are a good place to get a baseline for what adjustments need to be made for your car on the track. Tuning out problems and assessing issues will require careful consideration of your setup and conditions to choose what values you need to change to get your desired result. Start and keep a log of the changes you make, how the car felt and lap times to find out which settings to run to get around the track faster. As with all things suspension related, everything works in a system so changing your static camber will affect your toe, ride height, BS etc. Tuning is a constant give and take the process to find the perfect balance and is summed up by a quote I have come across. “For most formula cars, a decent engineer can change a multitude of things to get the same reaction….however… all changes have side effects that may hurt you in other areas. The GREAT engineers recognize the changes to be made to minimize the negative side effects and that is the edge that helps the car and driver perform the best.” If you feel comfortable with everything you’ve learned here check out The Definitive Guide to Suspension Tuning |